#Making Winter

Hello everyone, once again I am blogging from the comfort of my sofa, under my fleecy blanket watching the rain lash down.

I think it is the tail end of Hurricane Abigail but whatever the reason today is a day to stay in, keep warm and celebrate the positives of this season.

I was left a comment in a previous post about Silverpebble and went to have a look at the blog. It is a gorgeously photographed one and the owner, Emma, makes beautiful silver clay jewellery.

I was particularly interested in her idea of bloggers coming together to celebrate the creativity that being indoors more of the time can inspire.

Winter is a time of cosy homes, candlelight at night and the excuse to eat cake and craft without feeling any guilt for not being out doing something energetic, or mowing the lawn, ( not that I have one anymore thankfully), so I am very happy to celebrate #Making Winter with my fellow bloggers.

Go and have a look at the links on the above post for other ideas of how to combat the winter blues, I really want to crochet some snowflakes like Little Conkers has, and for a very good cause.

If you use Instagram there are pictures there as well with that hashtag.

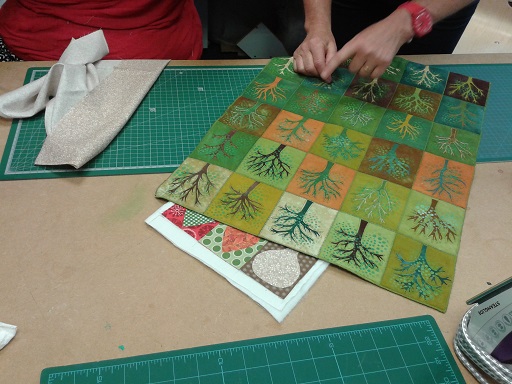
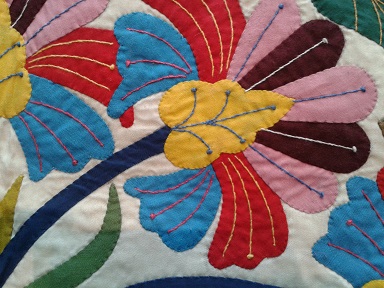
One of my goals for this winter season is to make more things for me, or specifically for my craft room. I love making things as gifts but my home contains very little of my own work and at the moment the craft room looks so pretty with all the quilt blocks up.

They will soon be gone as they are destined to become lap quilts as Christmas presents, (that is if I can get my new machine to behave as it keeps unthreading itself at the moment 😦  ) so I am working on some things to replace them.

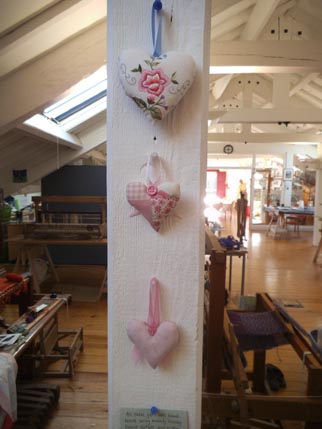
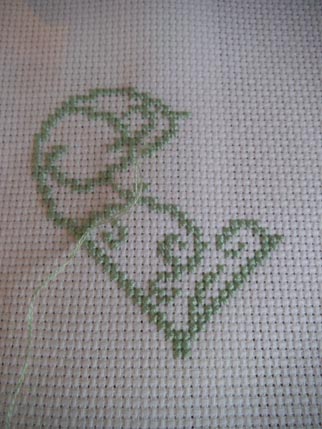
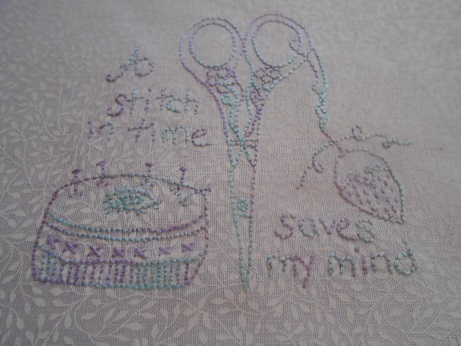
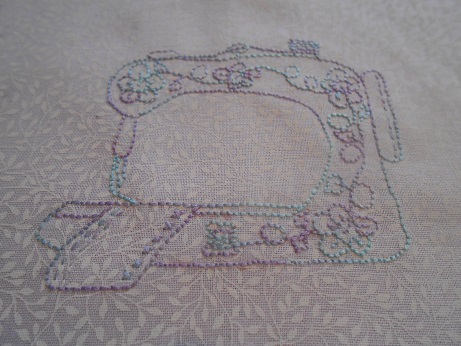
So I have been putting together a little hanging from Jenny of Elefantz’s  sewing themed stitchery. I have used some more of the gorgeous variegated thread from Cottage Garden and plan to add a patchwork border and some hand quilting.

Craft room Elefantz stitching Nov 1

Craft room Elefantz stitching Nov 2

Craft room Elefantz stitching Nov 3

I love looking at other people’s pictures of their craft rooms and have been very inspired by people like Messy Jesse, look at this beautiful stitching space, picture from her blog.

She is also very kindly giving away a free pattern for the Summer Baskets mini quilt in the picture.

Messy Jessy free quilt

I did venture out yesterday to Ikea to get some new storage for the craft room and have been having fun sorting out the space again. Sharon was getting rid of a bookcase so I have now moved all the magazines and quilt books there.

Craft room Nov 2

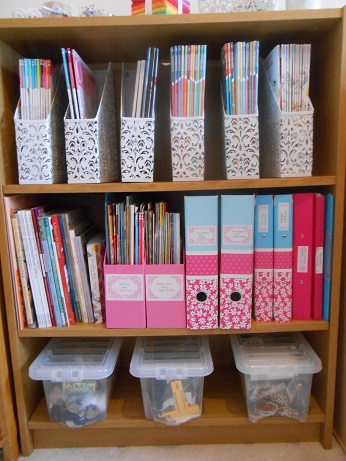
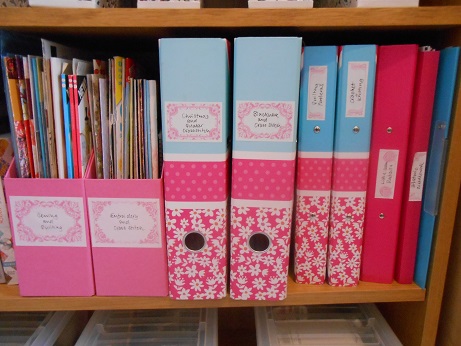
I found some lovely  coordinating labels at Ikea as well so I know I know which patterns are in which files!

Craft room Nov 3

Craft room Nov 4

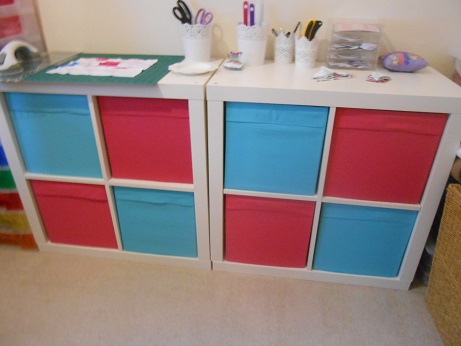
I have now got space on the units to use as a fabric cutting and sorting area. I bought more of the fabric storage boxes which fit inside the units yesterday.

It looks a lot prettier and more coordinated than the previous plastic boxes. There is also the added advantage that I can hide my stash, these could all be full of Christmas fabric and no-one would ever know 😉

Craft room Nov update

I also bought some more of the very pretty little metal containers for my tools, these are actually candle holders and plants pots and I think they work very well for organising while looking cute!

Craft room Nov 5

So am looking forward to lots and lots of winter weekends of adding to the craft room walls and trying out new techniques for quilting.

On my list are some Dresden Plate designs, some Farmer’s wife blocks and possibly some of Lori Holt’s work – have been very tempted by both the Farm Girl Vintage work and some of her other designs , look at this one called Sew Day, how perfect would that be in my craft room!

Lori Holt - Sew Day

At this rate I won’t ever want it to be better weather, will be very happy to stay in and craft forever!

Hope you have had a nice weekend and have some lovely things to do with your time, take care, thanks for visiting and see you soon.

The best kind of day

Hello everyone.

Remember when I posted about the Festival of Quilts and Gillian Travis’s prize-winning Nordic Jumpers Quilt and said I would love to go on one of her courses but they were usually in term time?

Quilt show - jumpers quilt

Well I found one that wasn’t and had the very best kind of day in a beautiful quilt shop, The Quilt Cabin in Hebden Bridge with Gillian and a small group of other textile enthusiasts.

The course was called, ‘ Take a Simple Shape’,  and was based on the idea of, ‘counterchange’, using one or two simple shapes, cutting them out of fabric and swapping the cut pieces to create different combinations of colour.

We started with Gillian showing us some of her work which is amazing, I lost count of the number of times I said, ‘wow’. The shapes she uses are not complex but the use of colour and machine stitching and in some cases printing combines to give stunning effects. Go and look at her blog  for more of the stunning inspiration.

This is one of her recent pieces, beautiful trees with outline stitching and printing using a stencil over each tree.

Quilt course - Gilian's trees

Gillian was a really good tutor, she showed us all her original designs as well as the finished products and took us stage by stage through the design process. The nice thing was that she encouraged us to use images from all sorts of sources so you don’t have to be a great artist to do this

My inspiration was all my lovely flowery Liberty fabric, I wanted to make a wall hanging for the craft room.

Quilt course - flower inspiration

I started with drawing different types of flowers until I decided on the shape I liked best. I want to use some of my flower buttons to embellish the finished product so thought this shape would work well.

Quilt course - flower drawings

The next step is to trace the flower onto fusible web and put onto fabric then you cut it out carefully so that you have a shape and the border to use.

Quilt course - flowers on bondaweb

Quilt course - flowers cut out

The clever bit is putting it onto different background fabrics doing a little mix and match until you are happy and can fuse everything together. Apologies for the upside down picture above – have misplaced my camera 😦 so am back to phone with limited editing!

Quilt course - flowers on fabric

You then add your backing and wadding and zig zag between the squares before embellishing and binding.

Quilt course - flower hanging

Mine is at this stage at the moment, I have chosen the buttons but need to do some more machine stitching to secure the flowers and some hand stitching as well, have just taken delivery of the most gorgeous Cottage Garden hand dyed variegated thread from this site so will be using some of that.

Here I am stitching at the workshop – action shot by Elaine from the quilt shop.

Quilt course - me machining

These were two of the others that were made by people on my course, I love the beetroot one and the bauble one might just have to used as inspiration for one of my own, I do have a bit of Christmas fabric to choose from 😉

Quilt course - other quilts

Quilt course - beetroot hanging

Looking forward to using my new machine for finishing this project, it has made such a difference having a good machine to work with, I finished the toile of the wedding jacket in 2 and a half hours with no problems with tension or jamming, it was a really pleasurable experience.

We are off to Lincoln Bishop’s Palace this weekend to do our last show with our group, hopefully there will be lots of sunshine and happy visitors!

Hope that you have a lovely weekend as well, take care and thanks for visiting.

Quilting inspiration

Hello again, today I wanted to share the rest of the pictures from the Festival of Quilts, these are mainly the modern and art quilts.

Unlike the traditional ones where the inspiration are blocks or wholecloth patterns that have been taken from lots of different published sources these really showcase the very wide and varied arts of quilting and the different inspirations that people use.

I love both types of quilting, I think traditional ones are my favourite just because I favour traditional things more but these examples below are stunning in their execution and really show some serious quilting skills as well as design skills.

This first quilt is called, ‘Marshwood Vale’, by Kate Dowty and was one of the most popular on display. A really unusual quilt with amazing quilted trees on top of the fabric landscape.

Quilt Show trees quilt

I think this one below was my personal favourite from the non-traditional quilts, this is , ‘Wish You Were Here’, by Tracy Aplin.

It still has some traditional elements like the hexi pieced centre and border but I love the quirky touches such as the appliqued sayings, (one of which is ‘it is Pimm’s o’clock?’ ), mini bunting and washing lines.

Quilt show 12

Quilt show 13

You can’t see in my picture but each corner is finished with a little caravan as well, a really unusual edging.

I have just found her Pinterest Boards and will be going back to them – so many pretty pictures and some of caravans! Especially this board her, ‘My Quilts’  , one – go and have a look at her, ‘Love of Liberty’ quilt – divine!

I love caravans, spent many very happy holidays in them as a child and am hoping to buy one myself when I retire and this quilt is a wonderful representation of that very British holiday!

Sharon has been on few quilting courses and one of her tutors is Gillian Travis who won second prize with this very unusual machine embroidered wool quilt called, ‘Jumpers’. This is beautifully executed and very original.

Quilt show - jumpers quilt

The lovely thing was that Gillian was wearing a shirt made from a print of a photo of the quilt as well. Here she is in that in this photo taken from the Facebook page of the Quilt Cabin in Hebden Bridge where she regularly teaches. Really wish that I could go on one of her courses but they are usually in term time.

Jumpers quilt and Gillian Travis

I was also very impressed by the Tent Makers of Cairo exhibition – not modern in the designs or the beautiful applique that makes up each pattern but in the sense of it being good to see men quilting.

These wonderful quilts are based on the traditional embroidery done for the inners of tents and were really stunning.

Quilt show 18 tent

Quilt show 19 tent

Quilt show 20 tent

Quilt show tent quilts

There were a few men at the show – Luke Haynes was exhibiting and we spotted Kaffe Fasset wandering about but the festival stats page shows that 97% of the visitors are women.

Come on boys get quilting, this is an amazingly versatile and relaxing hobby and it would be great to see more men doing it and crafting in general. Far more interesting than football 😉

My stitching is going well, just adding beads and doing the finishing touches and then can reveal all. Am sorely tempted to keep this one for me but will see, really need to build up the pile of Xmas pressies and though I have lots of WIPs have very little finished.

Of course if I spent less time blogging and reading blogs and Pinterest boards and going, ‘ooh how lovely’, I would get more done lol. My excuse is that my wrist is still a bit painful and needs rest.

Are you like me, lots of projects on the go? Trouble is I keep seeing new stuff I want to do and thinking I have far more time than I really do. Apparently it is only 19 more Fridays until Christmas!

Take care, keep busy and thanks for visiting.

Hexi love

Just thought I would do an update on my work yesterday and share with you a tutorial for my latest Xmas ornament. I had a very lovely day – unfortunately today is wet as well so I will just have to carry on sitting making more ornaments, how sad 😉

I would love to design and make full-time but in the mean time am happy with the little bits I get to do.

This is my third original Xmas ornament design, tutorials for the crazy patchwork Xmas tree  and information on the Crazy patchwork Xmas heart can be found at these links. None of these are earthshatteringly different from other things you can find on the web but are all my own work.

I have never done anything with hexagons before and have quite frankly considered English Paper Piecing a bit of a faff but I am very much enjoying this.

My inspiration came from two free gifts from my Love Quilting and Patchwork magazines. I started sewing the hexi pincushion last week on the train and I really liked it.


Hexi Xmas ornie 1

I do enjoy small-scale work and as friends have always told me these are very portable projects. The free pre-cut papers will come in very handy as well!

Here are the two I finished yesterday and below is a step by step guide for those of you who might like to have a go yourselves.

Hexi Xmas ornie 6

The ornament is made from 2 sizes of hexagon – 2 inch for the main body of the ornament and 1 cm for each of the hexagons in the ‘flower’. Please note that hexagons are sized by the length of each side (something that I found a bit confusing to start with) and you can happily mix metric and imperial measurements.

If you want to save yourself the trouble of drawing round a template here are links for free printables from the Snippets and Blabbery blog and some free printable hexagon graph paper  in different sizes and you can also buy pre-cut papers from many sources including these from Quilt Direct.

There are also lots of pre-cut (and even pre-stitched onto papers) fabric on Ebay if you really want to save time,  for me half of the fun is choosing the fabric though.

I used material from my small (ahem) stock of Xmas fabric but this design would work well from charm packs and scraps from other quilting.

Step 1 – Cut out 2 of the larger 2 inch hexagons from your backing fabric, I have used plain for the front and patterned for the back.

Step 2 – Cut out 7 of the smaller 1 cm hexagons – I used 3 different fabrics from the same ranges for each of my designs. You need a bigger seam allowance than you might think for folding over, I use 0.5 cm.

Hexi Xmas ornie 2

The small size of the hexagons makes it great for fussy cutting elements out of larger designs but you may have to watch the orientation of the hexagons when you stitch them together if the design had a ‘right way up’.

Fussy cutting means choosing a part of the design rather than just cutting out of the general fabric, it does mean you get more waste but the effect is good.

Step 3 – Sew the smaller hexagons onto your paper hexagons folding the seams over as you go. Use a contrasting thread then it is easier to unpick when you take the papers out. There is an excellent step by step tutorial on making a hexagon flower at Pretty by Hand’s blog here which shows how to stitch the pieces together.

Hexi Xmas ornie 3

Step 4 – Arrange the 7 hexagons into a flower shape and sew all the seams together using small stitches. If you are using a plain centre fabric the same as the backing then you could just have a ring of 6 hexagons but I liked the stability of the flower shape. Iron at this point to help secure seams for the next stage.

Hexi Xmas ornie 4

Step 5 – Remove the stitches and then the hexagon backing paper pieces carefully. I use my unpicker for this bit, you can re-use the papers if you are careful. I did then tack the outer 3 edges of each hexagon (those that are not sewn to anything), this makes the next step easier.

Step 6 – Applique your hexagon flower to one of the large backing hexagons using small stitches in a matching thread colour – if you have multiple colours in your flower go for a match to your backing fabric.

Hexi Xmas ornie - whip stitch detail

Step 7 – Put the appliqued front hexagon and your backing hexagon right sides together and stitch all the way round – I used hand stitching with a running stitch then went back to fill in the gaps but you could machine stitch.

Step 8 – Turn ornament to show right sides – poking the corners with scissor ends or a pencil help to ensure sharp corners.

Step 9 – Stuff the ornament – I use polyester toy filling for all my work available from craft shops or places like this on Ebay.

Step 10 – Turn the raw edges of the open side over, pin and sew. I have made this the top edge on my ornaments as however careful you are it never looks the same as all the other edges and the ribbon hides some of this.

Step 11 – Sew through the middle of the centre hexagon with some tiny stitches pulling tight to create a hollow in the centre – stitch a small button, bead or embellishment there.

Hexi Xmas ornie 5

Step 12 – Attach a ribbon to the back of the ornament, I have also added a bead to cover up the stitching.

Hexi Xmas ornie 7

If you want more hexagon inspiration go and have a look at this Pinterest page that I found the other evening – I particularly love the designs from the Broderie blog featured on that page though it would take centuries for me to complete anything like her quilts.

And look at this for hexi love – this was from the same Pinterest page, not sure who it was from originally but look at that stash!

Hexagon box

I am aiming to make 10 of these ornaments for this year’s friends and family seasonal gifts so am going to be having an enjoyable and productive Autumn.

Happy ornament making and thanks for visiting.

What a shame!

Hello again

Well it is raining here again, which is a bit of a shame as I wanted to go for a walk but true to form the moment I got my boots out it started pouring down.

I could have course have gone in the rain but decided I would just have to sew and knit all day, most of it in front of the TV where I am watching Supernatural on DVD courtesy of Ellie who has been trying to get me to watch it for ages.What a pity, poor me ha ha, it is even too wet for housework 😉

I have sorted out the error that I mentioned yesterday. I wanted to make an apron as a birthday gift for a friend’s little girl to send with some baking stuff I have bought. I remember Ellie being bought some baking things at a similar age and loving them so I have got cute pink utensils and pretty cup cake cases.

I found a really good free tutorial at a blog called Aesthetic Nest run by a woman called Anneliese who designs beautiful patterns for her 3 daughters (can feel a sewing spree coming on but must, must focus on medieval kit first!) She has an Etsy shop with her patterns and kids’ party printables which look brilliant.

The apron is made out of 2 fat quarters and is very easy to do (especially if unlike me you actually follow all the instructions and don’t put the straps in the wrong place and only discover that after you have hemmed it.)

She has made reversible ones but I made one out of 2 plain fat quarters from my Simply Solids Club stash and some applique motifs from a really cute fabric called Sweet Treats that I bought I couple of years ago.

Izzy's apron 1

And I am very pleased with the result. I particularly like the spotty pocket and straps.

I stitched the Sweet Shop label onto the pocket and added some buttons onto the sweetie jars. Am planning to add some sweets to the package for cake decorating so hope that she will like it.

I used the fabric motifs last year as part of a cot quilt that I made for Ellie’s friend and I still have quite a few motifs left over.

Sweet treats quilt

Have also finished stitching the replacement for the Autumn exchange piece that went missing so that will go in the post next week – fingers crossed this one gets there ok!

Hope you are having a lovely time whatever you are doing and thanks for visiting.

More from Hardwick

My lovely daughter Ellie has just sent me some further photos from Hardwick which I wanted to share with you.

The first two are of a painting of Arabella (or Arbella), Bess of Hardwick’s granddaughter, which hangs in the long gallery. This is a beautiful portrait and the detail on the sleeve is amazing.

Hardwick - Arabella 1

Hardwick - Arabella 2

This one is a ‘slip’ a tent stitched piece which has been appliqued onto a velvet background. This comes from the ‘Mary Queen of Scots bed’ although Mary never stayed at Hardwick but she may have slept in this bed as Bess’s fourth husband George Talbot the Earl of Shrewsbury was Mary’s jailor for a long time and Bess and Mary did spend time together sewing.

Hardwick MQoS Bed

The last three are of the volunteers at Hardwick on one of their recent costume days. Aren’t they wonderful. Ellie and I would love to do Tudor re-enactment, the costumes are so fantastic and it would mean I could wear some of my blackwork! We shall see what I have have time to do next year.

Hardwick - Costumes

Hardwick - Costume 2

Hardwick - Costume 3

Hope you have enjoyed these, thanks for visiting.

‘Hardwick Hall – more glass than wall’

We have had a very, very lovely day today – not only going to Hardwick Hall for the day but because my lovely daughter Ellie works there had a brilliant ‘behind the scenes’ experience which was amazing.

Here is the Hall in the lovely sunlight – as a contemporary of Bess’s wrote when it was built – ‘more glass than wall’.

Hardwick - hall front

Hardwick - garden

Here are some pictures of what the public gets to see.

The beautiful velvet heraldic embroidery created by Bess of Hardwick herself,  the blue silk bed hangings, the Great Hall with its bed canopy.

Hardwick - Bess velvet 1

Hardwick - Bess velvet 2

Hardwick - Blue silk bed

Hardwick - great hall

But we also got to go up on the roof! This is the top of the hall and the view from one of the small banqueting rooms that are in the towers.

Hardwick - Roof

Hardwick - Roof view

The best bit for me was going into the textile store rooms in the attic.Here are all the boxes with little pictures of the contents.

Hardwick - Textile store boxes

And here is Ellie opening one of the boxes for us.This contained a beautiful velvet hanging of flowers.

Hardwick - Ellie box

Hardwick - Flower velvet 1

Hardwick - Flower velvet 2

Another box had some more of the most wonderful of Bess’s heraldic pieces, here I am close up to this piece – no glass at all, heaven!!

Hardwick - Box velvet 1

Hardwick - Box velvet 2jpg

Hardwick - Box velvet 3

I feel very, very priviliged to have been able to do this – thank you Ellie!

And we were able to see the Gideon tapestries that have been away for conservation that she has been helping rehang – go and visit her blog for more details of this. The pictures below show the before and after effects of the cleaning.

Hardwick - Gideon 2

Hardwick - Gideon 1

A brilliant day – I loved it!

Take care all of you and thanks for visiting.

I am off to Florence on Sunday with my Mum so there may be some pictures of medieval art and churches when I get back – you never know!

Happy half term!

Hello there

Hope you have had a lovely week, I have had a really nice half term holiday as I have been on leave all week.

So there have been lots of lovely walks, crafting and socialising culminating in a trip to the next village in the valley for the Moonraker celebration yesterday.

I have spent the week making a small quilt for one of Ellen’s friends who has just had a baby.

I designed the pattern myself based on the motifs from the Sweet Treats fabric that I bought in Worcester at Ellen’s graduation.

I added fabric from my Simply Solids monthly delivery and some of the fabric that my Mum bought me for Christmas.

I made the quilt reversible and it is Moses basket or pram sized.

Sweet treats quilt

Sweet treats quilt 2

Sweet treats quilt 3

Sweet treats quilt 4

Here are a few pictures from the walk my sister-in-law Amanda and I did earlier this week up to a local reservoir.

It was beautiful weather really warm with such blue skies, very rare in Yorkshire in Feb!

March Haigh walk

March Haigh 2

March Haigh 3

Yesterday I went with my friends Taru and Bob and their daughter Leah along to the next village in the valley, Slaithwaite, where they hold the Moonraker festival.

We used to go to this every year when the kids were young but I have not been for about 8 years as I am usually in Spain at this time of year.

The festival celebrates a local legend about some smugglers who were trying to get some contraband that had fallen from a boat into the river.

When the Excise men caught them they denied any wrongdoing saying they were trying to ‘rake the moon’.

The festival is a parade of willow lanterns that are made throughout the week at workshops. The parade also involves lots of bands and culminates in brilliant fire sculptures and fireworks.

Each year the festival has a theme – this year it was time so Bob and Leah made a giant pocket watch.

There was also a Tardis and a White Rabbit from Alice in Wonderland along with lots of Big Ben clocks, egg timers and watches of all shapes and sizes.

Moonraker Leah and Bob's lantern

Moonraker tardis

Moonraker rabbit

Moonraker parade

Moonraker 2013

Today I walked along the canal to the village again, it was a beautiful sunny day and I saw geese and the first signs of Spring, these lovely daffodils outside one of the canalside cottages.

Slawit walk - lock

Slawit walk - geese

Slawit walk

My village is notorious for having sheep roam the streets (and eating the contents of people’s gardens!) When I got back from my walk today there were this little group at the bottom of my road.

Slawit walk - sheep

I am off to China on Thursday to teach for 3 weeks – going to Beijing this time so will not be blogging for a few weeks but expect some pictures of famous things when I get back – might even get to see the Great Wall!

Take care and thanks for visiting.

It’s official!

Well I have finally got my stall at Standedge Loft Space  and my membership as a designer maker. Am very pleased as I have wanted to sell things for a while and also it is a great way of supporting a local craft centre. My little stall looks very cute and I have got some nice feedback already.

Standedge craft stall

Standedge loft

Standedge membership

Standedge stall

It is a lovely space and I am looking forward to being able to spend more time there, especially over the summer.

There was a craft market this weekend and I bought this lovely fabric from my new friend Helen from my local knitting group. I am making a quilt for a friend’s baby and have used some of this fabric to add to my stash for that.

Material goods fabric

She and her friend Lucy run a fabric store called Material Goods in the next village – here is their card and link to their online store.

Material goods card

I have also been out for  a few walks over the weekend – there is still a bit of snow up on the hills and lots of sheep!

Feb snowy walks

Feb walk reservoir

Feb walk sheep

Feb walk snow path

I got my Winter Exchange this week from Kathy – isn’t it lovely – as soon as my partner has got hers I can post the stitching that I have done.

Winter Exchange Biscornu

I am planning lots of lovely walks this week as I am on holiday! There will be lots of crafting too and some nice nights out catching up with friends. Ellie has been here for all of last week and Jake is here this week so I am being very social!

Thanks very much for visiting.

Is it Thursday yet?

Hello everyone

Hope you are all ok, I have had a very busy week and am so looking forward to Thurs as that is the start of some time off work!!!

Am very excited and have lots of big plans for the week. I will be doing a little bit of decorating, lots of walking (hopefully, subject to the weather) and lots of crafting.

And then it is only one more week after that until I go to China again – how time flies, my mouth is already watering at the thought of all that lovely,lovely food!

Not much to show you this week on the crafting front due to working until stupid o’clock most evenings this week.

I did make these phone cases this week, I have so many ideas for things to make just can’t wait for my crafting week!

Phone cover 4

Phone cover 5

Decided to do a little stitch for me as well as so much of my output leaves the house and this lovely heart design will go very nicely in my kitchen. It is a very nice easy stitch so good for when I am tired and falling asleep in front of the TV!

The pattern comes from the Just Cross Stitch magazine Jan/Feb 2013 Issue and is called Heart Swirls. This is my new subscription mag for this year.

Heart cross stitch 1

Heart cross stitch 2

Have fun whatever you are doing and see you soon. Thanks for visiting.