
This post has been a very long time coming, I first wrote it two years ago as my friend Sarah, the very talented knitwear designer from Marsden, had asked me to make her wedding dress. The celebration was originally scheduled for April 2020 and the dress was finished on March 16th, just in time for her to tell me they were going to have to postpone for a bit 😦 Poor Sarah finally got to have the ‘official’ ceremony in August that year with just two witnesses, but the party only got to take place this last weekend, two years to the day that it would have been.
I am so glad that she finally got to have her celebration, the theme was Lord of the Rings as she and her partner Alan are huge fans. I wasn’t able to go, as knew I would be back in Spain for Mum’s birthday, but Sharon very kindly sent me some photos and she looked amazing in the dress. I will hopefully have some more photos of every else at some point as well as everyone dressed up.


When Sarah first chose this pattern for her dress I looked for reviews of it but didn’t find any so I thought it might be useful to write one in case anyone else wanted to make it. I have also talked about fabric choices as well.
Choice of garments in the pattern
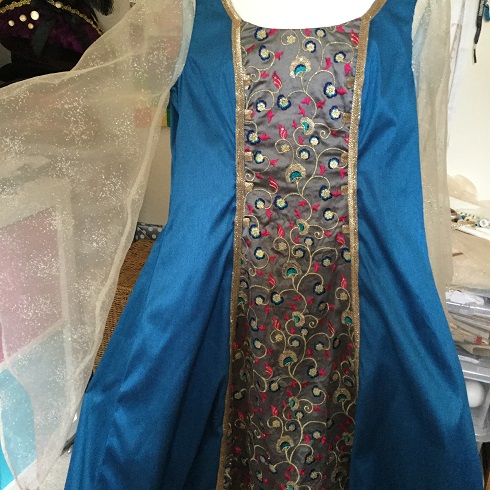
This is a good value pattern as you get different choices of sleeves and necklines. I made a combination of view A for the sleeves and the length of the dress and View B for the centre panel with braid and the cording loops. View A also has three panels at the front, but in the same fabric they are not as obvious.


Fabric choices
The pattern calls for light fabrics so we chose a beautiful blue polyester art dupion for the main body and a heavily embroidered grey silk for the centre panel. I trimmed the loose threads from the silk before using it.

The centre panel fabric did cause a few issues as it was quite difficult to sew the tabs for the front cording onto the panel. The tabs were made of the braid we chose for the edging and it was a really good match with the embroidery as it had the same kind of sequins but they were quite stiff to sew on.

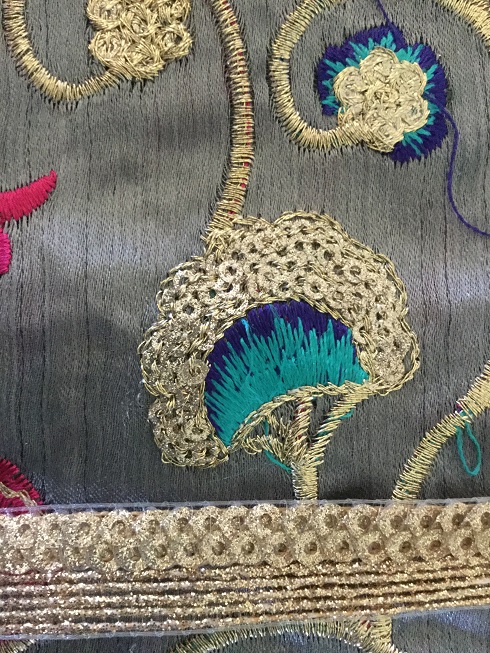
The front seams needed redoing several times as they would not stay still. If I made it again I would use a less textured material as the embroidery was very difficult to stitch through in places although it is a gorgeous fabric. The dupion was beautiful to work with, it was very easy to handle and didn’t crease easily so didn’t need ironing.
The sleeves were made of an organza with tiny sparkles on rather than a chiffon which meant they were a little stiffer. I think this looks good as they hold their shape more easily without having to hold your arms out all the time as the model is doing 🙂

They do take up a lot of fabric as there is a lot of waste on the layout. If you want to save money you could have shorter, narrower, sleeves and be able to get two cut out of each width. They would still be very pretty being a little smaller.
We bought extra fabric than that specified just to be on the safe side but due to an issue with the dye on the dupion ending up cutting all panels horizontally out of the width of the 60 inch fabric so could have got away with much less. The length was fine, although we had to cut 3 inches off each pattern piece to do that. My friend is of medium height but it was a good length with just a tiny hem.
Sizing
As with all patterns it bore little relation to shop sizing, I cut it out at size 16 for the bust as her bust inch measurement was 1/2 inch more than that for the size 14 and I am glad I did as it fitted really well. It gives 2 inches of ease on the finished measurements but there didn’t seem to be that much ease.

The waist was cut at size 16 as well although the inch measurement was a size 14 as the hips needed to be a size 18 and I didn’t want it to end up too tight on the waist. It is a very flowing design so does not need to be too specific in terms of the hip sizing.
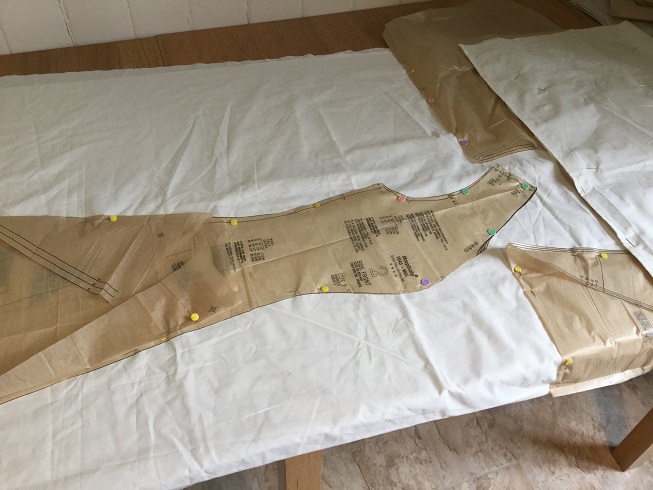
I made a toile out of an old bed sheet which was a similar weight to the actual fabric and there were no real fit issues. I did take the shoulder seams up by half an inch to give a better fit on the bust line and cut half an inch from the bottom of the armholes after the final fitting as it was a little tight there.
Instructions
The instructions were clear, I didn’t need to really follow them in detail as the dress was very easy to work out, it has seven panels and since they are all different shapes it was clear what went where. There were no complicated techniques.
The pattern had two pieces for each sleeve which would have meant a seam on the top which given the sheerness of the fabric I didn’t want so I cut it out using only the back piece (as it was slightly larger) on the fold and it was fine. I used French seams as instructed for the seams of the sleeves. This was all hand stitched and I also inserted the sleeves by hand as the organza was quite slippery and the sleeves so large I thought this was easier than trying to get it all through my machine.


I wanted to line the dress which wasn’t in the instructions so we bought some lining fabric and made another dress for the lining. This was then sewn to the neckline then hand stitched into the armholes and next to the zip.

There was a facing as well which I made and attached as instructed but it showed through the dress fabric and looked bulky so I trimmed it back to 1/2 inch, zig zagged it and then used that to attach the dress lining to.
Construction notes
All body pieces were zig zagged after cutting before sewing up which was a good strategy as the blue fabric frayed a lot. The sleeves were not treated in this way, they did not fray too much when cut so I left them raw and the French seams and the rolled over hem at the edges hid the raw edges of the fabric.
We did not have an invisible zip due to wanting to match the colour exactly so I inserted the zip leaving an overlap each side which was then sewn with small stitches so that the zip was hidden.
I cut the cording loop tabs at 7 cm according to the instructions but they looked too big so cut 2 cm off each. The pattern also asks for 1/2 inch cord but that looked too bulky so it was swapped for thinner cord.

Overall feelings
This was a very easy pattern to work with, the only issues we had in construction were to do with a few glitches with the fabric. I am not sure why they split the sleeve in two pieces but other than that and the removal of most of the facing everything worked well. I would make the pattern again and think it would be suitable for someone with little sewing experience as it is a straightforward make.


Time taken was around 50 hours in total but about half of that was hand stitching so if you were machining sleeves, lining etc it would be far less. I hand stitched the hems on both lining and main dress as I prefer the finish and enjoy hand stitching but if you are just making a costume you might not do that and the braid could have been machined on as well.
I hope that this has been useful, as I make more things with commercial patterns I will review them as I find it very helpful to read other people’s thoughts about what they use before I decide which patterns to buy.
I will be back in a while with more travel pictures, in the meantime, have fun, take care, stay safe and thanks for visiting.

It’s absolutely worth using a toile for things like this, isn’t it – there are always odd little gotchas, and just doing whateveritis once before usually stops it causing a crisis for the real thing!
Yes, especially with the sizing which was very bizarre. I have got into the habit of making toiles for all important makes now, it is a really useful learning curve.