Hello everyone, I hope that you did have a very nice weekend, mine was productive and I am posting today to share with you my latest creations.
I have told you before about my love of pincushions, like most crafters I have several and love making them but these are my very first knitted ones 🙂

I am making some things for my friend Sarah of Alder Sign Designs as she has a stall at Yarndale this September and these are the first two from the production line.
I took inspiration from all the lovely things on a pincushion Pinterest board here and another Pinterest search for knitted pincushions, (there are some seriously cute crochet ones out there, must learn to crochet next, my life will not be complete until I can make a granny square pin cushion!).
I didn’t follow a pattern, just made it up as I went along so I have put a tutorial here for you in case you want to make some yourself.
1. Using 2.5mm double pointed needles and 4 ply yarn cast on 45 stitches. Thicker yarn and/or larger needles will give a larger pincushion – these measure approx. 8cm inches in diameter.
2. Distribute the stitches evenly between the 3 needles.
3. For the purple pincushion knit in stocking stitch (all knit rows) until work measures 9cm in length.

4. Leave stitches on needles and using long tail of thread and large eyed needle gather all stitches, pull tight and fasten securely

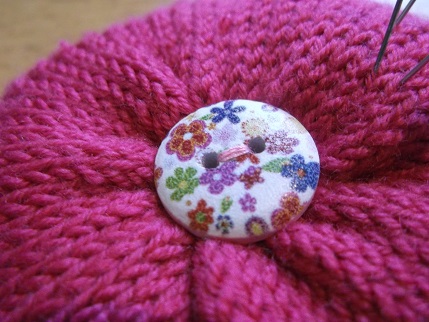
5. For pink pincushion knit in stocking stitch, (all rows knit), until work measures 4 cm in length then knit in moss stitch, (knit 1, purl 1) ,for 6 rows. Then knit in stocking stitch for a further 3.5 cm in length.

6. Finish as for purple pincushion in step 4.
7. Stuff firmly with polyester toy stuffing and then using length of yarn and large eyed needle pick up stitches from cast on edge to gather. Pull tight and fasten securely.
8. For purple pincushion – use a length of embroidery thread , (all 6 strands), or similar threaded onto a sharp needle. Stitch to attach thread to gathered up centre.
9. Securely wrap thread around the body of the pincushion to form eight segments. Pull tightly as you do this and secure each time you take thread back to centre with a stitch.
10. For both pincushions stitch buttons at centre of pincushion (top and bottom) to cover gathered join. Pull tightly when stitching to flatten pincushion. I did both buttons simultaneously then left thread tail inside of body.
11. Add co-ordinating pins!

One of my favourite bloggers, Mary Kathryn, has just made some gorgeous embroidered linen pincushions, go and have a look at her post about them, if she shipped to the UK I would have bought one as they are just beautiful.
I have just ordered some more buttons and charms from Etsy as well to decorate the next few batches of accessories , I really love these little decorated buttons that I first saw at Yarndale last year.
I am going to test out one with a lace pattern border this week to improve my skills at lace knitting in the round!
Take care and thanks for visiting.
